How-to
How to Set Up a Jewelry Bench at Home: Complete Guide
Set up a jewelry bench at home with the right bench height, bench pin position, lighting, seating, tool layout, metal recovery, soldering zone and safety.
Workshop section
Learn what makes a good jewelry bench, which features matter, how to choose a workbench for your jewelry making, and what tools deserve permanent bench space.
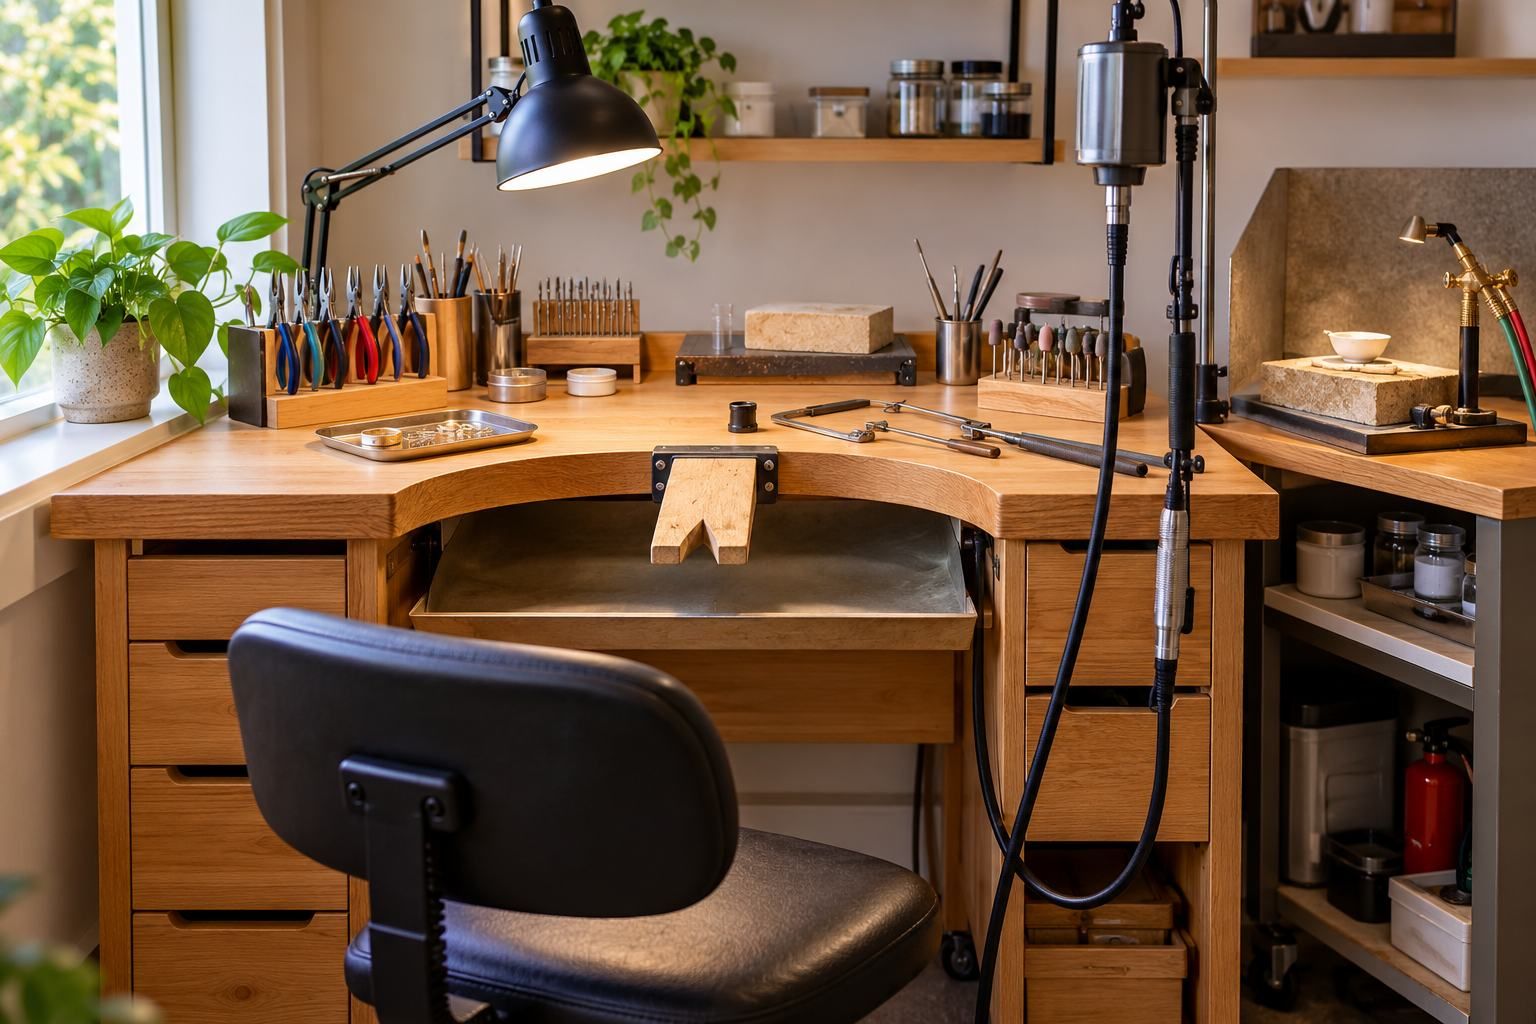
A jewelry bench is the main workstation for close, controlled jewelry-making tasks such as sawing, filing, drilling, setting, measuring, assembling and finishing small parts. Unlike an ordinary desk, a purpose-built jeweler’s bench is arranged around the working edge: the bench pin, workholding, lighting and metal-catching area are positioned where your hands naturally work.
You do not necessarily need a large professional bench to start making jewelry. For a home jeweler, the more important questions are whether the bench is stable, comfortable, easy to light, able to accept a bench pin or vise, and appropriate for the tools you actually use.
A dedicated jeweler’s bench becomes increasingly worthwhile when you work frequently, use precious metals, mount equipment permanently or need a repeatable working position.
| If you mainly need to… | Prioritize… |
|---|---|
| Start jewelry making at home | Stability, a usable bench pin, good lighting and enough clear working space |
| Saw, file and shape metal regularly | A solid working edge, comfortable bench-pin position and good workholding |
| Work with silver or gold | Effective collection of filings, offcuts and other metal waste |
| Mount vises or bench accessories | A strong, sufficiently substantial worktop and accessible mounting areas |
| Use a flex shaft frequently | Space for the motor, handpiece, foot control and accessory storage |
| Work in a small room | A compact footprint and vertical rather than excessive desktop storage |
| Build a long-term workshop | A dedicated bench that can be modified as your tools and techniques develop |
The best bench is therefore not necessarily the biggest or most expensive one. It is the bench that supports your normal work without forcing you into an awkward position or filling the working area with equipment you rarely use.
A normal desk gives you a flat surface. A jeweler’s bench is designed around a small, controlled working zone at its front edge.
The most recognizable feature is the bench pin: a replaceable piece of wood projecting toward the jeweler. It supports the work during sawing, filing, piercing and other hand operations. Because it becomes marked, shaped and modified over time, it should be treated as a working tool rather than as part of the furniture.
Many traditional jewelry benches also bring the jeweler closer to this area with a curved or recessed front. Below the working edge may be a tray, pan or apron intended to catch metal filings, clipped wire and small components.
That combination — bench pin, close working position and metal collection — is much more important to jewelry making than simply having a large desktop.
For bench work, movement is usually more troublesome than a lack of drawers.
Sawing, filing, hammering lightly, using a vise or pushing work against a bench pin all transfer force into the bench. A lightweight desk that shifts or flexes can make precise work unnecessarily difficult.
That does not mean every beginner needs an extremely heavy professional bench. It does mean that the working edge should feel secure during the operations you expect to perform.
If choosing between a sturdier simple bench and a less stable model with many drawers and accessories, the stronger working platform is generally the more useful starting point.
Storage can be added later. A weak working surface is harder to correct.
There is no single bench height that suits everyone.
The important relationship is between your seat, body, hands, bench pin and line of sight. Fine jewelry work often happens much closer to the eyes than ordinary desk work, so copying the height of an office desk may not produce a comfortable jewelry workstation.
Your seating position matters as much as the bench itself. You should be able to sit securely, reach the main working area without repeatedly stretching and bring small work closer when detailed inspection is required.
This is one reason it is useful to decide how you will actually work before buying a bench solely from its external dimensions.
For the full layout process — including seating, lighting, tool zones and metal recovery — see our guide to setting up a jewelry bench at home.
The bench pin is one of the most important parts of the jewelry bench because many hand operations happen on or immediately around it.
Typical uses include:
Bench pins are consumable and customizable. Saw cuts, grooves and worn areas are normal. As your work becomes more specialized, you may modify or replace the pin to suit the jobs you perform most often.
The important buying consideration is therefore not whether the supplied bench pin looks impressive when new. Check whether it can be positioned securely and replaced easily.
Holding small jewelry components steadily can matter as much as the cutting or shaping tool itself.
Depending on the work, a bench may eventually need to accommodate equipment such as:
You do not need all of these as a beginner.
What matters when choosing a bench is whether the worktop and front edge leave you reasonable options for adding the workholding systems you may eventually use. A beautiful bench with no practical mounting area can be surprisingly restrictive.
If you work with silver, gold or other valuable material, filings and small offcuts are not simply workshop dust.
A traditional jeweler’s bench often includes a collection tray beneath the bench pin. Other setups use an apron or similar catching surface.
The aim is to intercept material produced directly around the working zone before it disappears into carpet, gaps, drawers or general workshop debris.
Beginners working primarily with inexpensive materials may not initially place much value on this feature. As the value and volume of the metal you work with increase, an organized recovery system becomes considerably more useful.
It is also another reason to keep the area beneath and around the bench pin relatively uncluttered.
Jewelry work involves small edges, fine saw lines, surface defects, layout marks and tiny components. General room lighting alone is rarely the best way to illuminate all of them.
A useful jewelry bench should allow you to position strong local task lighting around the actual working area without filling that same area with large lamp bases or awkward cables.
More light is not automatically better. Placement matters. The aim is to illuminate the work clearly while controlling glare and troublesome shadows.
Magnification can be added when the work requires it, but magnification does not compensate for poor lighting.
Do not judge a jewelry bench only by its total width.
Ask how much of the surface remains genuinely useful after you account for lamps, tool holders, a vise, flex-shaft accessories, soldering equipment and anything else that may live nearby.
A compact bench with carefully positioned tools can be more usable than a large surface covered in equipment.
For small home workshops, think in zones rather than square footage:
Working zone: the bench pin and immediate area for the job in your hands.
Tool zone: frequently used hand tools that should be reachable without covering the working area.
Equipment zone: mounted or powered equipment that needs a permanent position.
Storage zone: less frequently used tools and consumables.
The exact arrangement can change as your work changes. Avoid filling every available centimetre simply because storage is available.
Not every jewelry tool belongs permanently on the bench.
Keep the immediate working area for tools that are used repeatedly during fine bench work: files, pliers, saws, measuring tools, small workholders and the handpiece of a rotary system are common examples.
Larger equipment needs more thought.
A flex shaft can integrate naturally with a bench because the motor can hang away from the main work surface while the handpiece remains accessible. If you are deciding whether that type of system makes sense for your workspace, see Flex Shaft vs Dremel for Jewelry.
A rolling mill is different. Its weight, leverage and mounting requirements usually make it something to plan around the bench rather than place casually on the main jewelry work surface. Our rolling mill size guide explains what to consider before allocating workshop space to one.
Likewise, tumblers and other finishing equipment usually work better as part of the wider workshop rather than occupying the central bench-pin area. See Magnetic vs Rotary Tumbler for Jewelry if you are planning a finishing station.
No. A beginner can learn many jewelry-making techniques without buying a professional bench first.
A sturdy table or adapted work surface can be enough when you are learning basic sawing, filing, assembly and simple hand-tool skills, provided you can mount the necessary work support securely and create a comfortable, well-lit working position.
A dedicated bench starts making more sense when:
In other words, buy the dedicated bench when the limitations of the temporary workspace begin affecting your work — not simply because a professional workshop has one.
A purpose-built jewelry bench is usually the better choice when close hand work is your main activity. Its working edge, bench-pin arrangement and storage are designed around seated jewelry work.
A conventional workbench can be better when the same surface must support larger fabrication, heavier forming or multiple non-jewelry tasks.
Some home workshops benefit from both: a seated jewelry bench for precision work and a separate heavier surface for operations that require more force or larger equipment.
If space forces you to choose one surface, think about the task you perform most often rather than trying to build a bench that is equally optimized for every possible jewelry technique.
Drawers are convenient, but the quality of the working position matters more. Start with the bench pin, stability and usable work area.
People, chairs and working styles differ. Choose the working relationship rather than chasing one supposedly universal dimension.
The area around the bench pin is valuable. Keep infrequently used equipment somewhere else when possible.
If you intend to add a vise, holding system or other bench-mounted tool, check how and where it can be attached before buying the bench.
This may seem unnecessary when you are practicing with inexpensive material. It becomes much more important once precious-metal filings and offcuts are part of your normal work.
A purpose-built bench can improve a mature workflow, but it cannot tell a beginner which techniques or tools they will eventually use. Starting simply can make later buying decisions easier.
A jewelry bench is a workstation designed for close jewelry-making tasks such as sawing, filing, shaping, drilling, setting and assembly. It normally centers the jeweler around a bench pin and may include specialized storage and a system for catching metal waste.
No. A stable table or work surface can be adapted for many beginner tasks. A dedicated jeweler’s bench becomes more useful as you work more frequently, use mounted equipment or need a permanent working arrangement.
A bench pin supports small workpieces during operations such as sawing and filing. It projects from the front of the bench so tools and saw blades can move around or beneath the work.
There is no single ideal height. The useful measurement depends on your seat, body proportions, bench-pin position and preferred working posture. Evaluate the working position rather than choosing a bench purely from its advertised overall height.
For light beginner work, sometimes. The desk needs to be stable enough for the tasks involved and able to support a bench pin or other suitable work support. An office desk becomes less practical as mounted tools, precious-metal recovery and heavier bench operations become important.
Not for every beginner, but it is valuable when working with precious metal because it helps collect filings, small offcuts and dropped material produced around the bench pin.
It can be part of the same overall workspace, but heat, flame, ventilation and fire-resistant surfaces introduce different requirements from ordinary sawing and filing. Plan the soldering area intentionally rather than assuming every part of the bench is suitable for hot work.
It can be when you work frequently enough to benefit from a permanent, stable and adaptable workstation. Occasional hobbyists may get more value initially from improving lighting, workholding and basic tools on an existing sturdy surface.
Plan bench height, seating, lighting, metal recovery, tool zones and the wider home-workshop layout.
Understand which type of rotary tool fits occasional hobby work and which makes more sense as a permanent part of the bench.
Choose a rolling mill around the material you expect to work, available workshop space and the capacity you actually need.
Compare two different approaches to batch cleaning, burnishing and finishing small jewelry pieces.
Read these in order if you are setting up this part of your bench for the first time.
Terminology, specifications and technique — what matters and why.
How-to
Set up a jewelry bench at home with the right bench height, bench pin position, lighting, seating, tool layout, metal recovery, soldering zone and safety.